Tuesday, June 26, 2012

Simple Windows Home Networking

There are hundreds if not thousands of Home Networking Products available on the market. This article will not cover the vast wired and wireless products out there. This posting is just to give a general idea, and a beginners start to Home Networking.

I hope that by the end of this article, you can share files, media on your Windows based network. There are many stand alone products out there that come with their own install CD/DVDs that can sufficiently walk you through the higher levels of Home Networking. I have not included Networked printing in this piece. Sharing printers, with different brands and drivers is still harder than it should be in many cases; so I have left that out.

What follows I hope you can understand and implement so your computing experience is easier and more convenient.

Why would you setup a Home Network?
       Central Access to files
       Sharing of Media (Music/Movies)
       Backup of Files
       Multiplayer gaming
Sharing your Backup Drive
Physically connect the drive via USB or Fireware, After the ‘Found New Hardware’ Wizard completes setup, you can view your Drive in your ‘Computer’ icon. The Drive I’m using for this demonstration showed up as the J: Drive. Yours will probably be a different letter close to D, E, F or G.

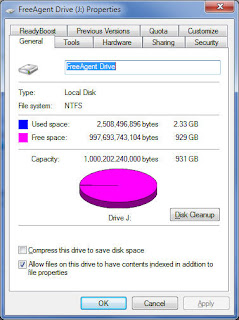
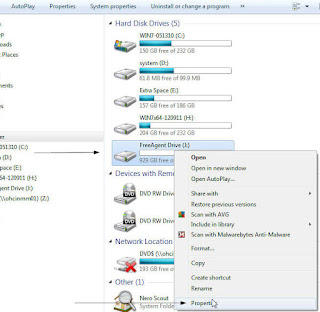
Right Click on the new drive and select Properties
Right Click Drive and Select Properties
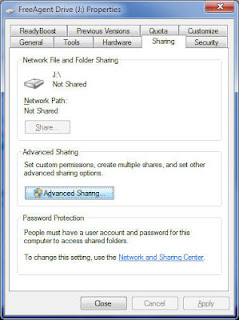
In the Properties Box for the new drive click on the Sharing tab.

Drive Properties Dialog Box

In the Sharing tab, click the box that says ‘Sharing’ and give it a name.


Sharing Tab


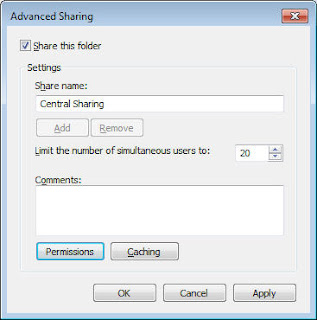
Sharing Box (Give it a Share name)

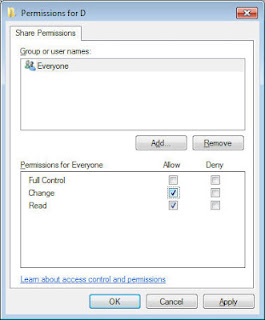
Before you click OK, you need to change the permissions on the shared drive to CHANGE so you can put files ON the backup drive from another computer.

Give it CHANGE permissions if you want to add files to the share from another computer

Now we are ready to map this drive from another computer to access the files.
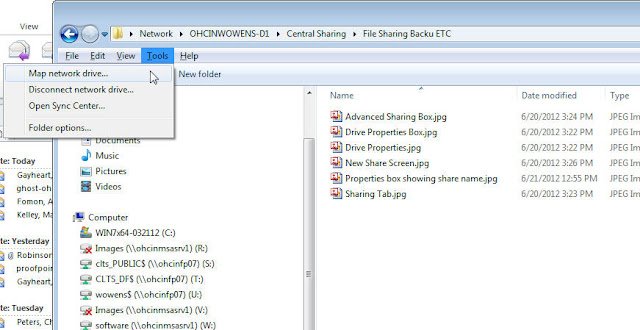
On the File menu choose Tools, Map network drive…

Map your new shared Drive from Another computer

Then type in the full path to the mapped drive. The Full path = Computername\Share Name
In this case OHCINWOWENS-D1\Central_Sharing. You will need the double slashes  

Type in the Full Share name you created earlier


Now you will see your mapped drive.

Mapped Drive
*NOTE if you are using username and passwords on your system that is sharing the drive, you will need that user name and password to Map or Connect that drive.
Now you can do simple copies for your files.
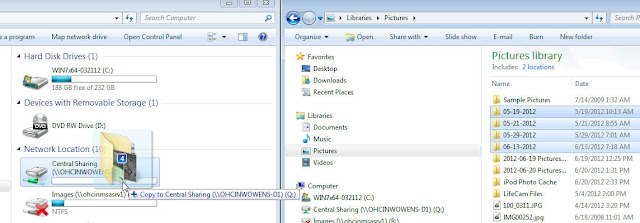
Simply Copy Files
It is that easy to create a File server accessible from other networked computers.


Part II
Media Streaming
To keep this convenient I am only going to cover Netflix and DirecTV. There are many other online resources for streaming Movies and Programs, like Youtube, HuLu, etc.
If you have a wireless connection on any Media enabled device like the Wii, Sony Playstation, or even a laptop hooked up to your television, you can stream Netflix.
Copyright of Netflix
These devices already are setup for your connection. They just need your wireless key for your home network (or to be directly plugged into your home high speed router) and your Netflix username and password.

Copyright of DirecTV
DirecTV now offers basically the same thing. You can now stream shows to your laptop or even your iPhone.

Part III

Personal Media Streaming

In some cases you want to share your own music to others in your household. To do this, Windows Media Player 12 offers you the ability to stream music, movies and pictures.
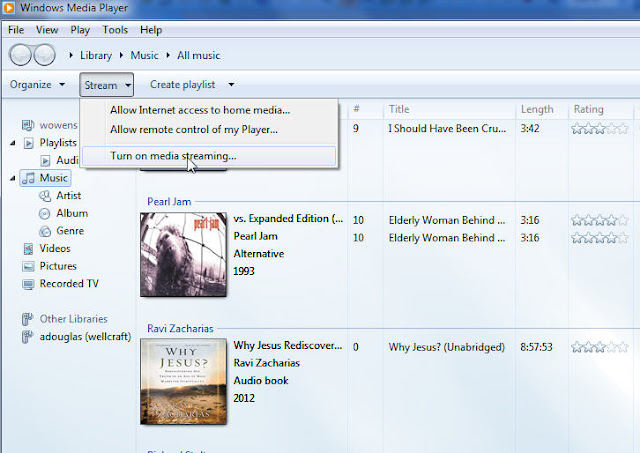
Turning on Streaming in Media Player 12
After you open Media Player, click Stream, and then Turn on media streaming....
You will now see the warning below telling your the risks of sharing files.
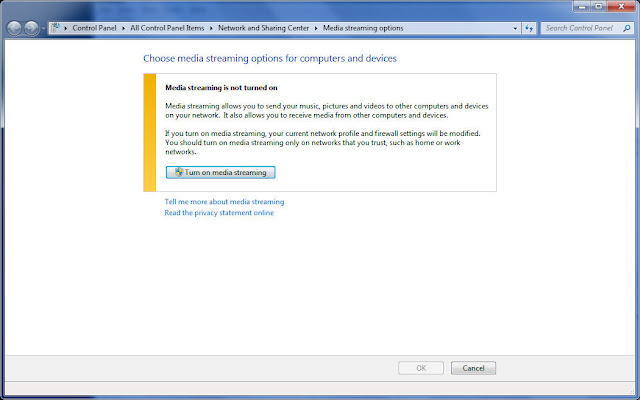
Warning for Media streaming

You can now give your Media server a name. Give it one that is unique so you will know it is YOUR media server.
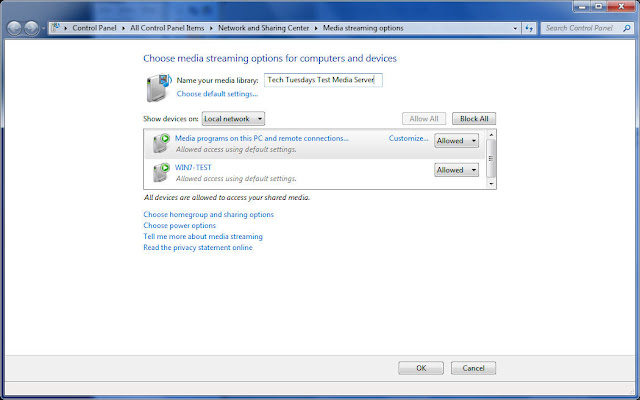
Give your Media Server a Name

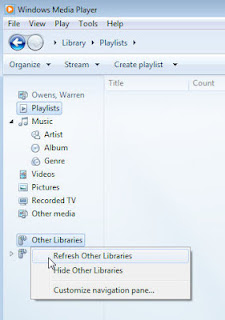
Now you can open up Media Player on a different Windows Computer and see your new Media Server. You may have to 'refresh' your 'libraries in order to see it.

Also, in my experience, if Media Player is not running on the Media Server Computer, it will not work.
<><>
<>
<><>
Viewing other Media Servers

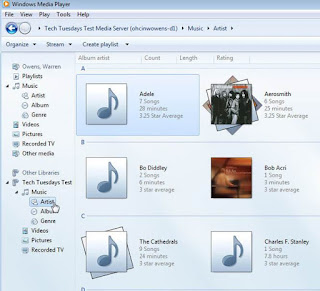
Viewing files from New Media Server.


Part IV

Multiplayer Gaming

Almost all modern multiplayer games that you purchase whether they are on the Wii, XBOX 360 or for the PC come with their own 'browsers'. Meaning, if you install these games on a networked device above, their browser will find other players with the same game.

You may have to turn off Windows Firewall for that particular game, and some games are on a subscription based system. Other than that, it would be nice if Windows networking was as easy as GAME networking.
games, games and more games

A quick word about Windows HomeGroup.
If you happen to have an ALL Windows 7 network (meaning all your computers at home are Windows 7), there is a system called Windows HomeGroup. It makes sharing a lot easier IF your computers are all Windows 7. You can find out more at the link below.

 
Thanks for again for view this article, I hope you find helpful.
Monday, June 25, 2012

Setting up a Dual Monitor Display for your computer

Setting up Dual Monitors
Why would you want two monitors?
       E-mail on one screen, work (Word, Excel, your browser) on the other screen.
       Very convenient when editing photos
       Bank account on one screen, spreadsheet on the other
       Communication software (e-mail, IM, Skype) on one screen, IE on the other
If you have a laptop, you will most likely need a ‘docking station’ or ‘port replicator’ to have a dual monitor setup


DVI and VGA Ports

VGA and HDMI ports


Some laptops have multiple ports you can use


If the case of a Desktop Computer, you may have multiple ports on your Video card.

Desktop Video Card with VGA and DVI slots

You will need a combination of the following cables, or two of the same type.

DVI Video Cable


VGA Video Cable


HDMI Cable


After you connect the cables to your system or docking station , you will need to configure Windows to display your desktop the way you wish.

Click the Start button, then run and type desk.cpl and click OK
Here are the Windows 7 and Windows XP Display Properties Screens. You can choose to EXTEND your desktop, or duplicate it. Depending on the job you are performing, you will most likely choose to Extend your desktop.
Windows 7 Display Properties


Windows 7 Display Properties Screen


Windows XP Display Properties


Windows XP Display Properties Screen


You may find that you need to install the drivers from the video card manufacturer’s website to maximize the functionality of your Dual Monitor Display. That goes beyond the scope of this article.


My Setup


Tuesday, June 19, 2012

Changing Firewall Settings in Windows XP and Windows 7

I wanted to put a write up of how to change your software Firewall settings in Windows XP and Windows 7.

WINDOWS XP

1. Go to the Control Panel

2. Then Double Click Network Connections

3. Now you want to right click on the Nework Device you are currently using. If you are using Wireless, then right click on the wireless. If you are using a network cable, then right click on the Local Area Connection. Choose Properties in the drop down menu.

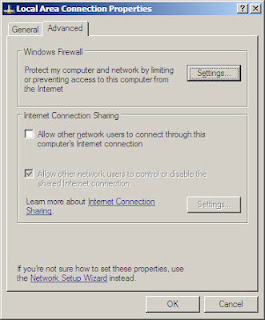
4. Now you have open the Connection's Properties box. Click on the Advanced tab at the top and then click Settings under Windows Firewall.

5. You should now see the Windows Firewall Property Box. In here you can turn on or off your Windows Firewall. You can also check the box so that there will be no exceptions to your Windows Firewall. If on the other hand you want certain programs to work uneffected by the Firewall you can click the 'Exceptions' tab.


6. Inside the Exceptions tab you can add any Program you have installed to an exceptions list. If you think your firewall is interfering with a program, you can add it here.


7. If you want to remove the Firewall option from any network device on your computer (Not recommended and only for testing purposes), of if you want to enable Security  Logging on your firewall, you can do this here.

This should give you the basics for starting/stopping and configuring your Windows Firewall in Windows XP.

WINDOWS 7

1. Click on the Start Button
2. Then type 'Windows Firewall' (without the quotes) in the open box. You will see Windows Firewall and Advanced Security appear at the top. Click on it.
3. Now you see the window that will allow you to change settings for your Firewall.
4. Click on the link that says 'Windows Firewall Properties'.
5. This will bring up the Windows 7 Firewall Properties box you can now turn the firewall on or off. The firewall options are much more indepth in Windows 7 and go beyound the scope of this post, but you can at least check and make sure your firewall is on and working properly from here.

Now you have the basics for operating your Windows Firewall in Windows XP and Windows 7.