Tuesday, September 25, 2012

More Problems with Facebook

The social networking monster!


I know that FaceBook is popular and handy for keeping up with long lost friends and family that you didn't really talk to in the first place. What people do with their spare time is there business, but you need to make sure what you do online doesn't put you, your finances, or your families safety at risk.

Below is another story about private messages all the way back to 2009 being exposed do to a bug.

I believe if everyone posted on the Internet like what they have written will be viewed by the entire planet, there might be less of an issue here. Nonetheless, no one wants their private thoughts put out to the whole world to read.

The bug must be real because the article claims that FaceBook founder Mark Zuckerberg himself had a private message displayed on his timeline.

As always, be safe, and you can read more about it here!

Thursday, August 16, 2012

More Facebook Security and Caution

New Feature in Facebook allows you to show others you're 'expecting'!

Facebook is now letting giddy parents add a new status to their Facebook called Expecting a Baby. I personally do not use Facebook for a whole host of reasons, but there are many people out there that do. This post is for those people.

The idea of letting people know where you are in the world at any given time doesn't seem like the wisest of options to me. Orlando Bloom, Megan Fox, Paris Hilton and other stars were set upon by thieves back in 2009 that used the Internet in combination with their online status to figure out when the best time was to rob their homes.

Now this brings up the new and creepy option of letting people know if you are expecting a baby, the gender, the due date and location. The information is voluntary (so is using Facebook BTW), and I would recommend you dont' put any of this information out there. There are too many disturbed people in this world to let them know when and where you are having a baby. That information can only lead to bad things in my opinion.

Watching you!


You can find more detail at the following link at Forbes. As always, try to stay safe on the Internet for you and your kids sake, and when in doubt, don't put personal information on the Internet for 7 billion people to see.

Tuesday, June 26, 2012

Simple Windows Home Networking

There are hundreds if not thousands of Home Networking Products available on the market. This article will not cover the vast wired and wireless products out there. This posting is just to give a general idea, and a beginners start to Home Networking.

I hope that by the end of this article, you can share files, media on your Windows based network. There are many stand alone products out there that come with their own install CD/DVDs that can sufficiently walk you through the higher levels of Home Networking. I have not included Networked printing in this piece. Sharing printers, with different brands and drivers is still harder than it should be in many cases; so I have left that out.

What follows I hope you can understand and implement so your computing experience is easier and more convenient.

Why would you setup a Home Network?
       Central Access to files
       Sharing of Media (Music/Movies)
       Backup of Files
       Multiplayer gaming
Sharing your Backup Drive
Physically connect the drive via USB or Fireware, After the ‘Found New Hardware’ Wizard completes setup, you can view your Drive in your ‘Computer’ icon. The Drive I’m using for this demonstration showed up as the J: Drive. Yours will probably be a different letter close to D, E, F or G.

Right Click on the new drive and select Properties
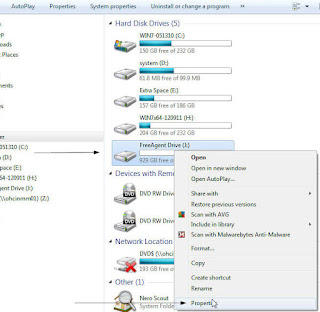
Right Click Drive and Select Properties
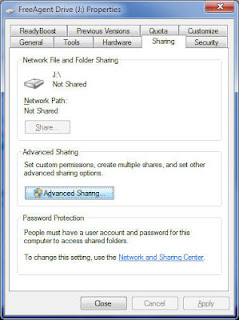
In the Properties Box for the new drive click on the Sharing tab.

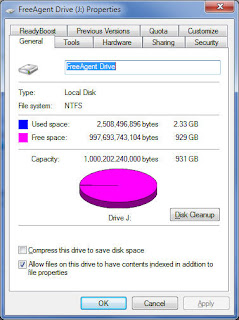
Drive Properties Dialog Box

In the Sharing tab, click the box that says ‘Sharing’ and give it a name.


Sharing Tab


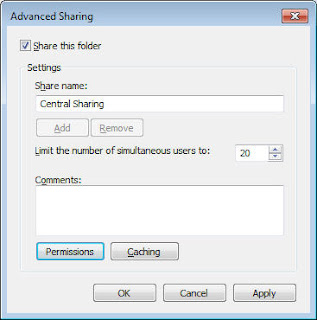
Sharing Box (Give it a Share name)

Before you click OK, you need to change the permissions on the shared drive to CHANGE so you can put files ON the backup drive from another computer.

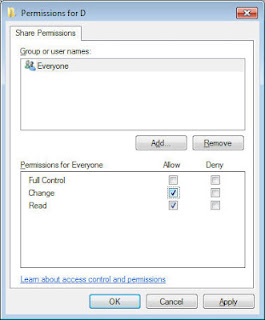
Give it CHANGE permissions if you want to add files to the share from another computer

Now we are ready to map this drive from another computer to access the files.
On the File menu choose Tools, Map network drive…

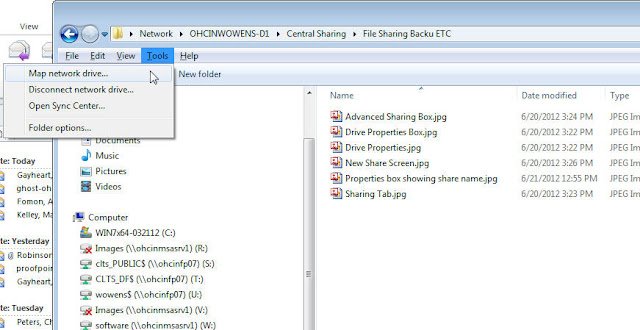
Map your new shared Drive from Another computer

Then type in the full path to the mapped drive. The Full path = Computername\Share Name
In this case OHCINWOWENS-D1\Central_Sharing. You will need the double slashes  

Type in the Full Share name you created earlier


Now you will see your mapped drive.
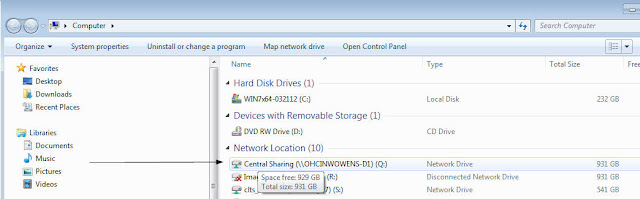
Mapped Drive
*NOTE if you are using username and passwords on your system that is sharing the drive, you will need that user name and password to Map or Connect that drive.
Now you can do simple copies for your files.
Simply Copy Files
It is that easy to create a File server accessible from other networked computers.


Part II
Media Streaming
To keep this convenient I am only going to cover Netflix and DirecTV. There are many other online resources for streaming Movies and Programs, like Youtube, HuLu, etc.
If you have a wireless connection on any Media enabled device like the Wii, Sony Playstation, or even a laptop hooked up to your television, you can stream Netflix.
Copyright of Netflix
These devices already are setup for your connection. They just need your wireless key for your home network (or to be directly plugged into your home high speed router) and your Netflix username and password.

Copyright of DirecTV
DirecTV now offers basically the same thing. You can now stream shows to your laptop or even your iPhone.

Part III

Personal Media Streaming

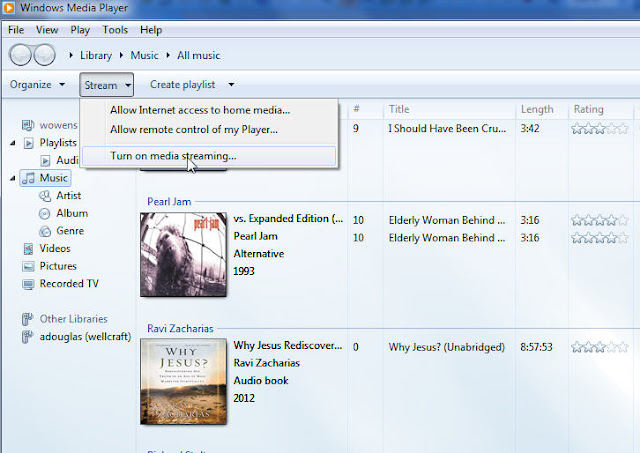
In some cases you want to share your own music to others in your household. To do this, Windows Media Player 12 offers you the ability to stream music, movies and pictures.

Turning on Streaming in Media Player 12
After you open Media Player, click Stream, and then Turn on media streaming....
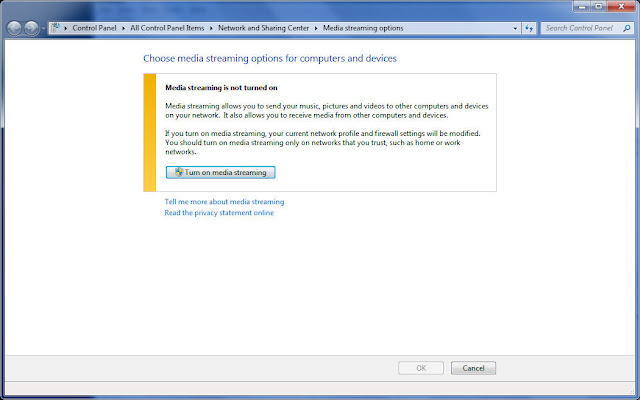
You will now see the warning below telling your the risks of sharing files.
Warning for Media streaming

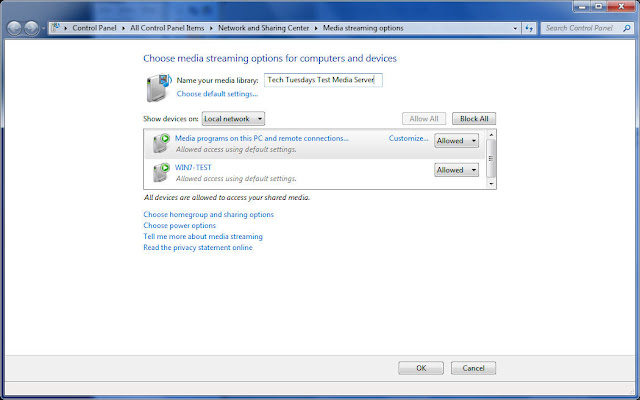
You can now give your Media server a name. Give it one that is unique so you will know it is YOUR media server.
Give your Media Server a Name

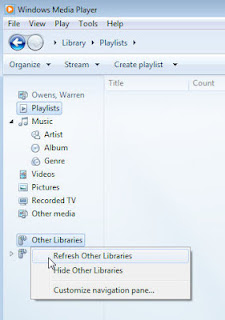
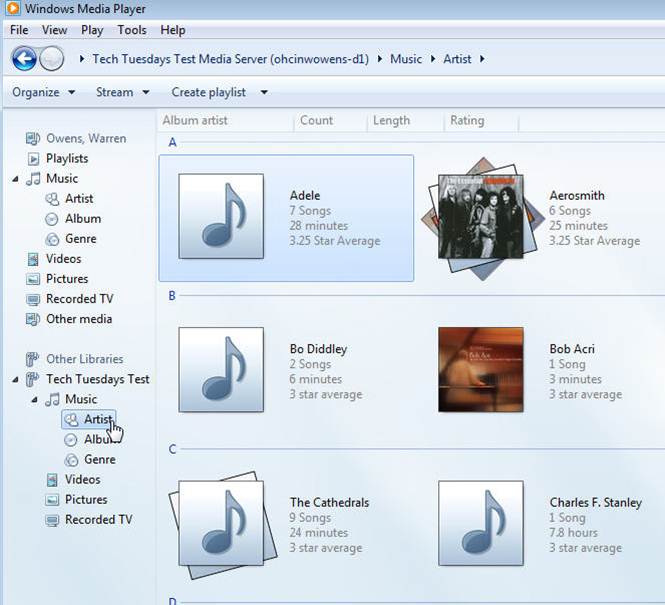
Now you can open up Media Player on a different Windows Computer and see your new Media Server. You may have to 'refresh' your 'libraries in order to see it.

Also, in my experience, if Media Player is not running on the Media Server Computer, it will not work.

<><>
<>
<><>
Viewing other Media Servers

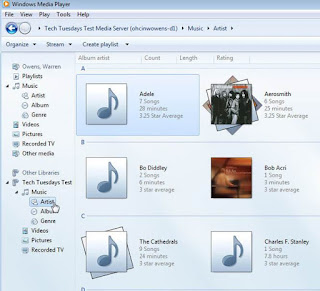
Viewing files from New Media Server.


Part IV

Multiplayer Gaming

Almost all modern multiplayer games that you purchase whether they are on the Wii, XBOX 360 or for the PC come with their own 'browsers'. Meaning, if you install these games on a networked device above, their browser will find other players with the same game.

You may have to turn off Windows Firewall for that particular game, and some games are on a subscription based system. Other than that, it would be nice if Windows networking was as easy as GAME networking.
games, games and more games

A quick word about Windows HomeGroup.
If you happen to have an ALL Windows 7 network (meaning all your computers at home are Windows 7), there is a system called Windows HomeGroup. It makes sharing a lot easier IF your computers are all Windows 7. You can find out more at the link below.

 
Thanks for again for view this article, I hope you find helpful.

Monday, June 25, 2012

Setting up a Dual Monitor Display for your computer

Setting up Dual Monitors
Why would you want two monitors?
       E-mail on one screen, work (Word, Excel, your browser) on the other screen.
       Very convenient when editing photos
       Bank account on one screen, spreadsheet on the other
       Communication software (e-mail, IM, Skype) on one screen, IE on the other
If you have a laptop, you will most likely need a ‘docking station’ or ‘port replicator’ to have a dual monitor setup


DVI and VGA Ports

VGA and HDMI ports


Some laptops have multiple ports you can use


If the case of a Desktop Computer, you may have multiple ports on your Video card.

Desktop Video Card with VGA and DVI slots

You will need a combination of the following cables, or two of the same type.

DVI Video Cable


VGA Video Cable


HDMI Cable


After you connect the cables to your system or docking station , you will need to configure Windows to display your desktop the way you wish.

Click the Start button, then run and type desk.cpl and click OK
Here are the Windows 7 and Windows XP Display Properties Screens. You can choose to EXTEND your desktop, or duplicate it. Depending on the job you are performing, you will most likely choose to Extend your desktop.
Windows 7 Display Properties


Windows 7 Display Properties Screen


Windows XP Display Properties


Windows XP Display Properties Screen


You may find that you need to install the drivers from the video card manufacturer’s website to maximize the functionality of your Dual Monitor Display. That goes beyond the scope of this article.


My Setup


Tuesday, June 19, 2012

Changing Firewall Settings in Windows XP and Windows 7

I wanted to put a write up of how to change your software Firewall settings in Windows XP and Windows 7.

WINDOWS XP

1. Go to the Control Panel

2. Then Double Click Network Connections

3. Now you want to right click on the Nework Device you are currently using. If you are using Wireless, then right click on the wireless. If you are using a network cable, then right click on the Local Area Connection. Choose Properties in the drop down menu.

4. Now you have open the Connection's Properties box. Click on the Advanced tab at the top and then click Settings under Windows Firewall.

5. You should now see the Windows Firewall Property Box. In here you can turn on or off your Windows Firewall. You can also check the box so that there will be no exceptions to your Windows Firewall. If on the other hand you want certain programs to work uneffected by the Firewall you can click the 'Exceptions' tab.


6. Inside the Exceptions tab you can add any Program you have installed to an exceptions list. If you think your firewall is interfering with a program, you can add it here.


7. If you want to remove the Firewall option from any network device on your computer (Not recommended and only for testing purposes), of if you want to enable Security  Logging on your firewall, you can do this here.

This should give you the basics for starting/stopping and configuring your Windows Firewall in Windows XP.

WINDOWS 7

1. Click on the Start Button
2. Then type 'Windows Firewall' (without the quotes) in the open box. You will see Windows Firewall and Advanced Security appear at the top. Click on it.
3. Now you see the window that will allow you to change settings for your Firewall.
4. Click on the link that says 'Windows Firewall Properties'.
5. This will bring up the Windows 7 Firewall Properties box you can now turn the firewall on or off. The firewall options are much more indepth in Windows 7 and go beyound the scope of this post, but you can at least check and make sure your firewall is on and working properly from here.

Now you have the basics for operating your Windows Firewall in Windows XP and Windows 7.


Wednesday, May 30, 2012

Technology Showcase

Here is the video from the Technology Showcase Tech Tuesdays Class.

The iPad was the hit of the class, but we also have a Nook, Fujitsu 6470, Lenovo X220 Tablet with a touch screen and the LT1421 14" monitor from Lenovo. In the Thursday class there will also be an MacBook Pro.

As always, thanks for coming to the classes, hope to see you at future Tech Tuesdays!

Friday, May 25, 2012

Making sure deleted data is deleted

When you delete a file on a Windows based computer, or even if you format the computer, the files aren't really gone. What windows does is take off the label or 'header' of the file to let Windows know it can use the space for something else.
That is why in many cases you can get files out of your recycling bin, or you can buy a program that recovers deleted files. The information is still there, now the label, or nametag is gone. If you want to really delete a file, you need a program that deletes files entirely. There is a method for this kind deletion and it is the Department of Defense standard.

When you delete your internet browsing files, and when you delete those old and fuzzy pictures that aren't quite in focus, they're not really gone. Yes, even some files that might not exactly be appropriate. If you're not worried about what you do on the computer, who else has access to your computer? You may not do anything inappropriate on your computer, but a family member, coworker, friend or neighbor might.

When you delete something, you typically want it to be gone forever. Enter the program that I seem to be using more and more for whatever ails my computer, Ccleaner. There is an option in Ccleaner called 'Wipe Free Space'. When you run Ccleaner it warns you that if you check this option, it can take considerably longer to 'clean' your system. It is worth the extra time in my opinion. Below is a screenshot of the option grayed out at the bottom.

You can change the settings Ccleaner to wipe the free space on your system to run 1, 3, 7, or even 35 passes on your free space. The highest setting can take a considerable amount a time run, so be warned.


You files should definately be deleted after you run it this way.

If you are going to sell your computer, or sell a hard drive on Ebay or even give away your computer, I would recommend using a utility that will wipe the entire drive. There are many utilities that will do this, but use Active @ KillDisk. It is easy and quick to use. It is not hard to configure and this should take care of your files from the most curious of people besides law enforcement.

There are many ways to make sure a drive and it's files is unrecoverable. One that almost everyone has access to, and is 100% reliable is the hammer!

Just simply smash the hard drive till you hear the platters inside the drive shatter. I recommend you where saftey goggles and follow all safety procedures while using the hammer. Also, I personally use the claw end of the hammer, it seems to get the job done quicker. 

Friday, May 4, 2012

Social Networking, Facebook and your Privacy

I'm a firm believer in not redoing someone else's hard work. Consumer Reports has put up a great video on Facebook about guarding your privacy.

Propspective employers, lawyers in custody hearings and divorce proceedings are using what you do and say online in hiring decisions and in court. In article after article there are more cases of people losing out on a job opportunity, or even losing benefits or disability payments because pictures posted on Facebook.

While I am not so much worried about people getting away with duping their spouses, employers or the government, there is also the worry about having your identity stolen on some social media site. Also, there is the safety of children and child abduction cases to worry about. This is a real threat and needs to be taken seriously.

So below is a great video about Facebook privacy that you should watch and take the needed steps to protect your online identity.


When in doubt, don't post something online. There is a saying that goes 'once on the Internet, forever on the Internet'; You can't get it back.

Tuesday, April 24, 2012

PC Tune Up and Clean Up


Tech Tuesdays PC Tune Up and Clean Up Class


Steps for Tuning Up your PC.

1.     In Programs and Features (Windows 7) or Add Remove Programs (Windows XP). Uninstall any programs that you no longer use. If you are in doubt about a program you can search for the program on the Internet. If you are still in doubt, leave it alone.
           
2.     Install and run CCleaner. Clean your system using the default settings. If you want to get a more in-depth cleaning, you can change some of the options.

3.     Next, Run the Registry cleaner from within CCleaner and remove clean all entries it finds.

4.     You may now want to go into Tools/startup on CCleaner. In here, only disable DO NOT DELETE any entries. If you make a mistake and remove something you need, you can go back later and enable it.

5.     Now open and run Disk Cleanup. This program comes with every Windows system. Start/Programs/Accessories/System Tools in Windows XP and Start/All Programs/Accessories/System Tools and then select the options you wish to clean, and remember to clean the ‘system restore’ files under the ‘More Options’ tab if you feel you no longer need them. Click ‘OK’ to clean the files and remember when it is finished, there is the ‘Poof’ factor, meaning it won’t tell you when it is done, it will just disappear from your screen.

6.     If you’ve made it this far, it is time to run Disk Defragmenter. You can find Disk Defragmenter in the same location as Disk Clean up above. Highlight the drives you want to Defragment and click ‘Defragment Disk’. When it is done, it won’t disappear from your screen, but it won’t say ‘I’m finished’. Microsoft assumes a lot.

In Conclusion, if you your computer is running slow and you remove unwanted Programs and Files, and then Defragment your drive you should see a performance increase.

If you still do not see improvement, you may have malware/virus infection, or it may be hardware related, meaning you need a RAM or Hard drive upgrade. A full hard drive performs slowly.


Physical Cleaning or your computer

1.     With a Desktop Computer, use a can of compressed air outside on a clear day. Open the case side door, and remember you may have to take off the front cover. Blow out as much dust as you can. Blow out the power supply, processor fan, and any other fans and vents you find.

2.     With a Laptop Computer, use a can of compressed air on the bottom of the laptop and keyboard only. Do not spray on or at the display. You can cause dust particles to actually get behind the screen.

3.     For LCD screens, laptop screens and tablet screens I recommend a micro fiber cloth. You can get them at Staples, Wal-Mart or almost any store. Micro-fiber cloth will protect your screen against scratches. If your screen is extremely dirty, micro-fiber clothe with a little screen cleaner will work wonders.

4.     For CRT Screens and the outside of desktop computers I recommend Windex. Windex can be harsh on newer screens, but if you have an old CRT (big and fat) monitor, Windex will work on that and on the outside of most desktop cases.
     
Remember you can get files like CCleaner and Defraggler at the following URL

      http://www.filehippo.com/

     Below is the Audio and PowerPoints from the Class.